Read Happy Endings: Finishing the Edges of Your Quilt Online
Authors: Mimi Dietrich
Tags: #Crafts & Hobbies, #Quilts & Quilting
Happy Endings: Finishing the Edges of Your Quilt (34 page)

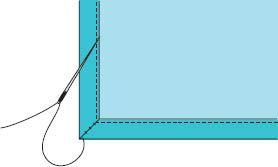
6.
At the outer point, move the needle through to the front of the miter and stitch the miter on the front of the quilt, continuing to the inner miter corner.
7.
Check to see if there is a space between the rows of machine stitches in the corner. One or two small stitches can close this space easily.

8.
Now stick the needle through to the back side of the quilt and continue to attach the binding on the back side. This same process can be used to close the fold where you begin and end your binding.

Slip Stitch or Ladder Stitch
A slip stitch is used to finish the front and back without binding, to sew the straight edges of the binding, and to attach the back of the quilt to prairie points, ruffles, pleats, or cording. It is a good stitch to use on long, straight areas.
1.
Bring your needle up through the folded edge of the binding. Take a small stitch in the fold of the binding, approximately ⅛" to ¼" long.

2.
Move straight across to the quilt and take a small stitch in the top layer of the quilt, just past the machine stitches that were used to apply the binding.

3.
Now move your needle straight across to the binding and take a small stitch in the fold. Repeat until you have five or six stitches between the quilt and the binding. The stitches will resemble the rungs on a ladder.

4.
Pull lightly on the thread until the stitches disappear. Take care not to pull too tightly or the fabric will pucker.

Ending Stitches
When you start to run out of thread, it’s time to end your stitches.
1.
Lift up the binding and take a small stitch in the seam allowance. Take two backstitches to tie a knot in the thread, stitching through the loops as you take the stitches. These stitches will be under the binding when you continue and will never be seen.

2.
When you get to the end of the binding, take two small backstitches near the last stitch, slide the needle through the top layer of the quilt about an inch, and bring the thread out. Clip the thread and you are done!
Machine Stitches
When you are constructing your quilt, sewing the front and back together, or applying binding or special finishings, set the stitch length on your machine to 10 to 12 stitches per inch. This stitch length is very secure, but it’s also just the right size for your seam ripper (just in case you need to use it).
Machine Piecing
When sewing binding strips together to make a long strip, or making continuous binding, set the stitch length on your machine to a shorter 12 to 15 stitches per inch. These small stitches will hold the pieces together without backstitching, especially as you cut continuous binding strips apart.
Machine Basting
Use a machine basting stitch with a length of six stitches per inch when you are basting quilt layers together, preparing a string of prairie points, gathering ruffles, or making covered cording. These longer stitches hold fabric together but are easy to remove if necessary.
Machine-Finished Binding
It’s possible to apply the binding on your quilt entirely by using the sewing machine.
1.
To apply single-fold or double-fold binding, sew the binding to the back of the quilt rather than to the front. When the binding is turned to the front of the quilt, the finishing machine stitches will be on the front.
2.
Turn the binding to the front of the quilt. Carefully pin all around the quilt to keep the binding in place and prevent it from slipping. Pin the mitered corners securely. Make sure that the binding covers the machine stitches that were used to sew the binding to the quilt.
3.
Machine stitch the binding to the quilt along the fold at the inner edge of the binding. You will be sewing through the binding fold, the three layers of the quilt, and the binding on the back of the quilt. This may be very bulky, but it can be controlled. You may need to use a long straight pin to adjust the fold as it goes under the machine presser foot. The machine stitches produce a nice edge to the binding on the front of the quilt, but it’s difficult to control the position of the stitches on the back of the quilt. This may not be the method to use on your heirloom or prizewinning quilt, but it is a quick way to finish the binding.

4.
If your quilt has mitered corners, it is best to ignore the miters as you sew around the binding by machine. Turn the corner when you get to the inside miter corner and continue stitching. The miter will survive if you just leave it folded, but you can close the miter using hand blind stitches.