Read Happy Endings: Finishing the Edges of Your Quilt Online
Authors: Mimi Dietrich
Tags: #Crafts & Hobbies, #Quilts & Quilting
Happy Endings: Finishing the Edges of Your Quilt (28 page)

BOOK: Happy Endings: Finishing the Edges of Your Quilt
3.62Mb size Format: txt, pdf, ePub
ads
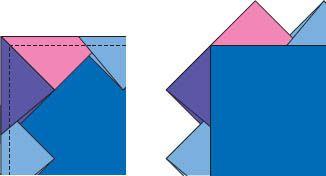
5.
In the corners of the quilt, place two prairie points as shown so that they fit together side by side. They should not overlap. When you sew them onto the quilt edge, pivot your seam where they meet. When they are turned to point out, there will be a perfect corner.
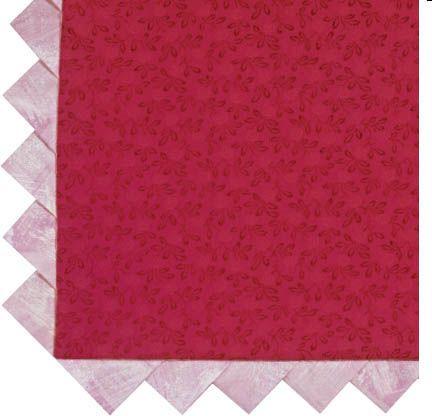
6.
To sew the prairie points onto your quilt, first pin the cut edge of the points to the cut edge of the quilt top. If you have made a long string of points, make sure that you have the same number of points on opposite sides of your quilt. You may need to shift a few of the prairie points near the quilt ends as you go to fit the side of the quilt accurately. Sew the prairie points to all four edges of your quilt, using a ¼" seam. To finish sewing your quilt together, refer to “Attaching Special Finishes” on
page 55
.

Happy Ending Hint

For a different effect, you can fold fabric squares in half horizontally instead of diagonally. Then fold the two ends in toward the center on the diagonal as shown. This method gives a symmetrical appearance to the folded triangles. When they are applied to your quilt, these triangles look nice if they are stitched side by side rather than overlapped along the edge.

For an extra special look, make the prairie points from pieced squares. When they are folded, the accent color will appear inside each triangle. You can use either the diagonal or horizontal folding method as shown.


Continuous Prairie Points
A quick way to add prairie points is to make a continuous strip of them that fits the edge of your quilt. To fit the edges of the quilt accurately, you must be able to divide the side of your quilt equally by the size of the prairie points. In the following step-by-step instructions, we’ll use 3" prairie points as an example, but you can adjust the size of the cut prairie points to 2½" or 3½" if that works better for your quilt size.
1.
Cut strips twice as wide as the finished measurement of the prairie point. For 3" points, you’d cut 6"-wide strips.

2.
To determine the length of the strips, measure the edges of your quilt. For a small quilt, cut individual strips of fabric the length of each side. For a large quilt, cut multiple strips that add up to the total length of the quilt, keeping in mind that you’ll overlap the individual strips later on as you pin them to the quilt edge.
Happy Endings Hint
If the edge of your quilt can’t be divided equally by the size of the prairie points, you may be able to trim the border of your quilt slightly to accommodate the prairie points. On a large quilt, you can adjust segments as you overlap them to fit the length of each quilt side.
3.
Press the strip in half lengthwise, wrong sides together, to mark the vertical center. Unfold the strip and, on one side of the fold, draw lines dividing the strip into 3"-square segments. On the other side of the fold line, first mark a 1½"-wide segment (half of the 3" measurement), and then mark 3"-square segments until you have another 1½" segment remaining at the end.

BOOK: Happy Endings: Finishing the Edges of Your Quilt
3.62Mb size Format: txt, pdf, ePub
ads
Other books
True Compass by Edward M. Kennedy
Heiress Behind the Headlines by Caitlin Crews
In Death's Shadow by Marcia Talley
The City of Your Final Destination by Peter Cameron
Wake the Dead 2 (Wake The Dead Series) by Vanucci, Gary F.
Punishing Me (Shaft on Tour #6) by Cat Mason
Three Little Words by Lauren Hawkeye
Deep-Fried Homicide (The Laurel Falls Mysteries Book 1) by Patricia Lee Macomber
The Complete Essays by Michel de Montaigne
The Wrong Mother by Sophie Hannah