Read Happy Endings: Finishing the Edges of Your Quilt Online
Authors: Mimi Dietrich
Tags: #Crafts & Hobbies, #Quilts & Quilting
Happy Endings: Finishing the Edges of Your Quilt (21 page)

9.
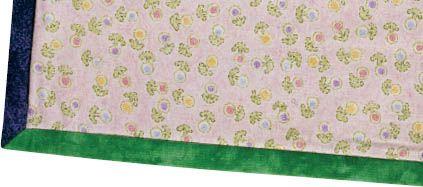
Hand stitch the binding to the back of the quilt, taking three or four blind stitches along the mitered fold on the back. Then stick the needle through to the front and take three or four stitches along the miter on the front. Push the needle through to the back of the quilt and continue stitching the binding onto the back of the quilt.

Happy Ending Hint
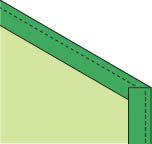
As you fold the binding to the back, work from the back of the quilt and fold one edge first, and then continue around the quilt counterclockwise to fold the other edges. This way, the miters on the back will be folded with the bulk going in the opposite direction of the miters on the top of the quilt, thereby distributing the fabric thickness at each corner.

Folded Miters for Other Angles
The folded-miter method can be used on angles that are not square, such as on vests or six- or eight-sided quilts.
1.
Stitch the binding to the first side of the quilt, stopping ¼" (or the width of the seam) from the first angle, and backstitch.

2.
As you make the first binding fold, make sure that the binding strip extends so that it is in line with the second edge of the quilt as shown.

3.
Fold the binding down so that it is aligned with the second edge of the quilt. Note that the folded edge will not be in line with the first edge of the quilt as it is for square-corner quilts. However, the fold should still touch the first side at the point, creating a small tuck as you continue stitching the binding.
4.
To finish the binding, fold it to the back and hand stitch it in place as in steps 6–9 beginning on
page 47.
Stitched Mitered Corners
While folding mitered corners is a bit quicker and easier than stitching the miters at each corner, this technique is a handy one to know for the times when you’d like different-colored binding on adjoining sides of your quilt. You can still have the professional look of a mitered corner, but have two different fabrics coming together to create the miter.
Straight-grain binding is easier to control for this technique than bias binding. Cut each binding strip so that it is 4" longer than the quilt side. As you place your binding on the edge of the quilt, allow 2" to extend beyond each end of the quilt.
1.
Sew a binding strip to each side of the quilt, stopping ¼" from the ends (or the width of your binding seam), and backstitch.

2.
Fold the binding out over the seam allowances, overlapping the two strips at right angles. If you are applying single-fold binding, fold the second seam allowance now. Mark the strips where they cross (point A in the diagram).
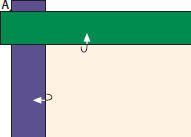
3.
On the wrong side of the binding, draw a line from point A into the corner seam (point B). Then place your ruler along the stitching line and make a mark at the folded edge of the binding, directly across from the corner seam, at point C.

4.
Place your ruler so that it is perpendicular to the drawn A-B line and touches point C and the diagonal line. Draw a line from point C to the A-B line to create point D.

5.
Fold the quilt top with right sides together so that the two binding strips are aligned and the A points match.
